
This blog explains to you how to create new events in your Google Calendar using Velo’s (Wix Corvid) enhanced capabilities while using the Google Calendar API & Google’s OAuth 2.0 Authentication Process. First create the API Authenticator Web Application by placing 2 Text Boxes & a Button on your page as shown below. The Google Calendar Node Quickstart link is: https://developers.google.com/calendar/quickstart/nodejs
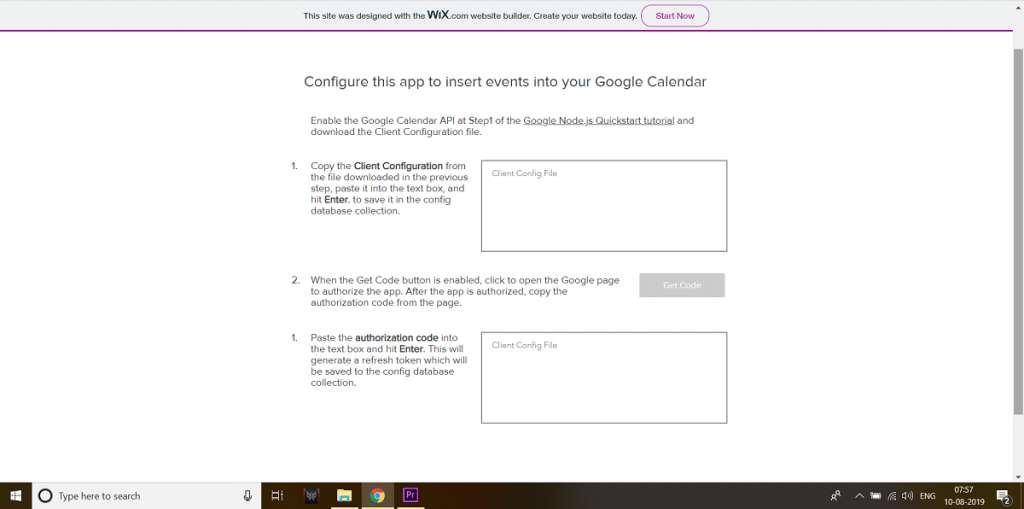
Make sure you set the Button to ‘Not’ be enabled on load. The top-most text box should have ID in the properties panel as clientConfig
The button should have the ID of getCode & the lower text box should have the ID of authKey
Both the text boxes should have an onKeyPress event handler as shown in the video. The button should not have any event handlers. Additionally have 2 hidden ‘success’ icons beside your Text Boxes and give them the ID of configUploaded & authSuccess respectively. Both the icons should be set to ‘hidden on load’ in the properties panel. Your final page code will look like below.
Now add the googleapis NPM using the Node Modules option in Wix’s Visual Editor. After this add a Backend (.jsw) file named config.jsw with the following code.
Great job so far! Now add another Backend (.jsw) file named createEvent.jsw which will be the file housing the function which creates events in your Google Calendar. Following will be the code, just copy and paste it.
Now we are almost there. In the next paragraph you will learn how to setup the UI and the page where the user will enter the event’s details.
Your final page will have a total of 5 Text Boxes, 2 Dropdowns & 2 Date Pickers apart from a Button. The following breakdown will help you understand the elements and their use in the Event creation process.
User Input Elements (ID to be set in properties panel):
- summary: Text Input Element; To capture the Event Name/Header
- location: Text Input Element; To capture the Event Location
- desc: Text Box; To capture the Event Description
- startDate: Date Picker; The date when the Event starts
- startTime: Dropdown; The time when the Event starts
- endDate: Date Picker; The date when the Event ends
- endTime: Dropdown; The time when the Events ends
- email1: Text Input Element; Email of Attendee #1
- email2: Text Input Element; Email of Attendee #2
- insertEvent: Button to insert event
Create an onChange event handler for both the Date Pickers & create an onChange event handler for both the Dropdown elements. Finally, create an onClick event handler for the button. Your final page code should look like below.
Now pay attention to lines 42, 43 in the above code. You need to replace +05:30 with your own Timezone so that your event’s timing is recorded properly in your Google Calendar.
Your last task is to create a Database Collection and create a total of 2 columns (including the default ‘Title‘ column) named the following.
Database Column Names:
- Title
- Value
After this your Web Application should be functioning smoothly.
Keep in mind that this is the basic method of creating events, now you can read the Google Calendar API Documentation and take control of how you want your application to behave.
While you’re here we would like to let you know that we undertake projects for development of web applications from agencies, development firms & businesses. Send us a message by filling out our form here.
 Get Quote